
Github主页Profile装饰指南
前言
该文章使用我自己的Github Profile编写,我用到的装饰方法非常少,但我已经满足了。
各位如果喜欢这篇文章记得给我的Profile来个Star
另外,如果各位想要制作更加吊炸天的Profile,可以参考 Andrej Marinchenko 这位俄罗斯大佬的Profile
准备工作
如果你想要在你的Github主页上显示你的Profile,你就必须创建它。
创建步骤如下:
新建一个库,切记它的名字一定要是你的用户名,用户名不是你显示的名称,而是你注册Github时设置的用户名Username。
其次,你需要将它设置成Public,并添加Readme。
如图所示 (这里警告是因为我已经创建了):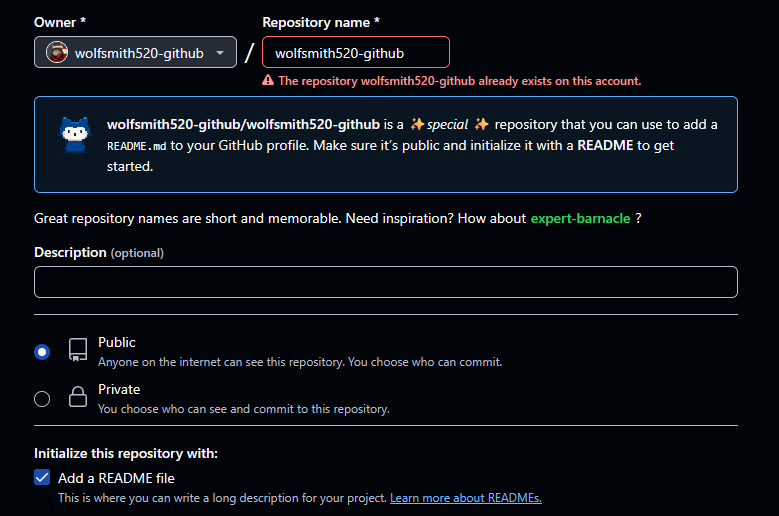
给工作流权限
首先你需要进行一项设置
进入你的 GitHub 仓库 → Settings → Actions → General
最底部的Workflow permissions需要设置成Read and write permissions,这样才可以运行起来大多数工作流
生成 GitHub Personal Access Token
许多装饰插件都需要你基于权限。其中就需要设置Token。
这里以Metrics插件为例:
访问设置界面
点击右上角头像 → Settings → 左侧菜单最底部的 Developer settings → Personal access tokens → Token(classic)生成token
- Generate new token → Generate new token(classic) → 输入token的名称(例如
token) - 设置有效时间(Expiration),建议选
No expiration,但需注意安全风险 - 勾选权限范围
- repo(用于访问仓库数据)
- read:user(用于读取用户信息)
- read:org(如需读取组织信息)
- gist(如需生成 Gist 统计数据)
- 点击 Generate token
3.复制生成的Token(一定要保存好,关闭页面后就不可能再获取了,如果丢失只能重新生成!!)
将 Token 添加到仓库 Secrets
- 进入你的 GitHub 仓库 → Settings → Secrets and variables → Actions。
- 点击 New repository secret:
- Name 输入
METRICS_TOKEN(请记住你输入的名称)。 - Secret 输入你刚刚复制得到的Token
- Name 输入
- 点击 Add secret 完成添加。
在workflow中使用
在负责Metrics的工作流中输入
1 | - name: Generate metrics |
这样Metrics就可以获得访问你的私密项目的权限并在生成图表的时候算在内
各种效果
1. 打字机效果
- 基本代码
1 | <img src="https://readme-typing-svg.demolab.com/?lines=Text+Line+One;+Text+Line+Two;¢er=false&width=1000&height=50&size=32&font=Righteous"/> |
参数解释
lines后面添加文字,空格使用+代替,如果有几段文字,中间使用;+分开。width为图片长度,但不管怎么设置生成的长度都不可能低于文字显示的长度,height同理。size为文字的字体大小。font为文字的字体。center文字在图片中是否居中。
效果展示

2. 主页浏览数计数器
计数器可以使用一个开源的项目 Moe Counter,至于效果,rule34的post计数器就是用的这个
想要这个效果其实非常简单,只需要这一行代码
1 | <img src="https://count.getloli.com/@你的Github用户名?theme=你想要的主题"/> |
@后也可以是其他的内容,其原理是根据你给出的用户名生成一个单独的网页。
主题在上面的官网中可以查看,这里我使用Helltaker的主题生成一个本页面浏览数的计数器 (2025.4.20开始)
3. Github账号开发信息
本文只介绍3个状态图的生成:开发者信息,活跃程度 和 语言使用情况
- 效果如图
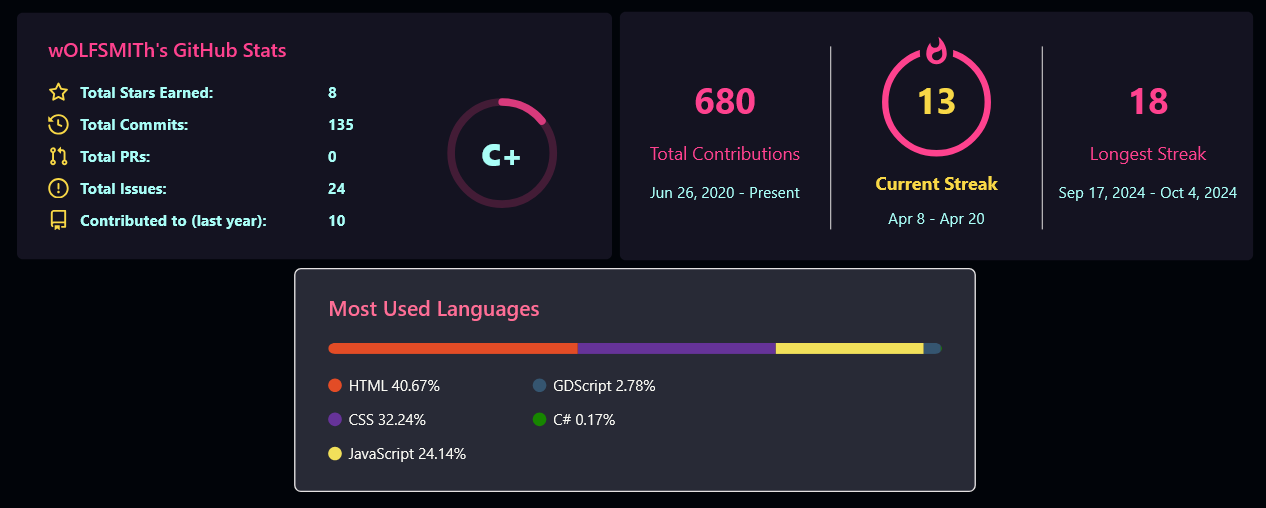
开发者信息
1
<img width="47%" src="https://github-readme-stats.vercel.app/api?username=用户名&include_all_commits=true&theme=radical&hide_border=false"/>
include_all_commits如果选false,只会显示你今年的贡献数theme主题,主题样式很多,可以根据GitHub Readme Streak Stats关键字搜索hide_border是否隐藏边框,如图上方2个为隐藏,下方一个为不隐藏
活跃程度
1
<img src="https://github-readme-streak-stats.herokuapp.com/?user=用户名&theme=radical&hide_border=true"/>
语言使用情况
1
<img src="https://github-readme-stats.vercel.app/api/top-langs?username=用户名&locale=en&hide_title=false&layout=compact&card_width=500&langs_count=10&theme=dracula&hide_border=false"/>
locale建议不要更改,默认就是英文hide_title是否隐藏标题,标题即图片中的Mosted Used Languageslayout设置为compact更为紧凑,设置为default更为完整card_width自定义卡片宽度langs_count最多显示多少语言
4. 用近一年内的贡献图制作一个贪吃蛇动画
- 效果图

很酷是不是,添加这个的方法也非常简单,首先确保你给了action足够的权限
更详细的使用教程可以直接访问该项目的 Github 页面
- 首先你需要在你的Profile库中创建工作流
- 其路径为
你的库跟目录/.github/workflows/工作流名称.yml - 随后输入下面这串工作流代码
1
2
3
4
5
6
7
8
9
10
11
12
13
14
15
16
17
18
19
20
21
22
23
24
25
26
27
28
29
30
31
32
33
34
35
36
37
38
39
40
41name: generate snake
on:
schedule: # UTC 0:00 Beijing 8:00 (北京时间0点自动更新一次)
- cron: "0 0 * * *"
# allows to manually run the job at any time
workflow_dispatch:
# run on every push on the master branch
push:
branches:
- master
jobs:
generate:
permissions:
contents: write
runs-on: ubuntu-latest
timeout-minutes: 5
steps:
# generates a snake game from a github user (<github_user_name>) contributions graph, output a svg animation at <svg_out_path>
- name: generate github-contribution-grid-snake.svg
uses: Platane/snk/svg-only@v3
with:
github_user_name: ${{ github.repository_owner }}
outputs: |
dist/github-contribution-grid-snake.svg
dist/github-contribution-grid-snake-dark.svg?palette=github-dark
# push the content of <build_dir> to a branch
# the content will be available at https://raw.githubusercontent.com/<github_user>/<repository>/<target_branch>/<file> , or as github page
- name: push github-contribution-grid-snake.svg to the output branch
uses: crazy-max/ghaction-github-pages@v3.1.0
with:
target_branch: output
build_dir: dist
env:
GITHUB_TOKEN: ${{ secrets.GITHUB_TOKEN }}如果你像我一样什么都不懂,请不要瞎改,直接复制黏贴就行了,任何小的改动都会造成失败
- 其路径为
- 做完这项工作后就可以在库的 Actions → generate snake (工作流name后的名字) → run workflow
- 如果不出任何意外,你会获得一个output分支,里面会有2张svg文件,一张是用于暗色主题的,另一张是用于亮色主题的,将它们放在你的Profile里就可以了。
5. 3D贡献图展示
- 效果图

这同样是使用工作流进行生成,该项目的 Github页面 里有更详细的教程
我这里同样只给出可用的工作流,因为我本人仍然在学习中
1 | name: GitHub-Profile-3D-Contrib |
运行后会在main分支内创建一个 profile-3d-contrib 文件夹,里面就是你生成的svg文件了
6. 各式图标与Badge
- 效果图
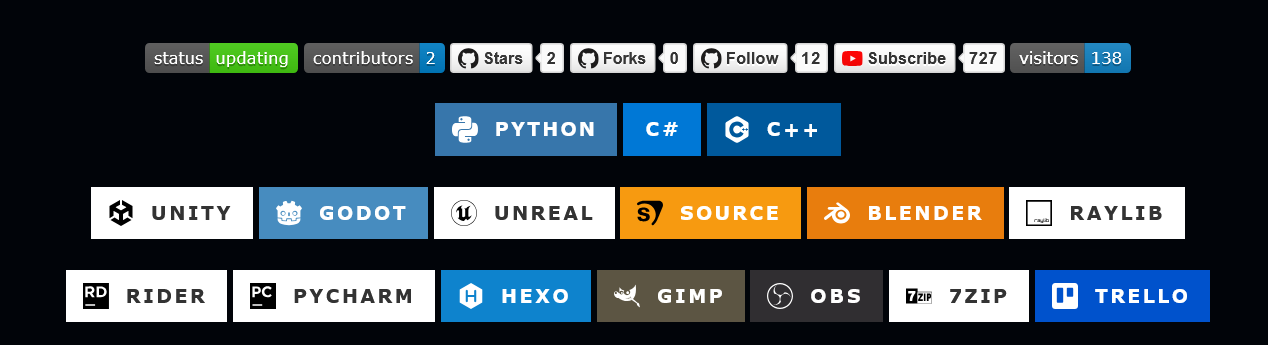
其中最上面一行为Badge徽章,可以制作的东西相当的多,建议去这个项目的官网一探究竟
这里我给出我图中部分的Badge源码
1 | <!--选定库的状态(Dynamic Badge)-->> |
以上是一些动态徽章,会根据信息的改变而改变,还有很多固定的徽章,如你使用的工具,编程语言等
以下以Godot为例子
1 | <img src="https://img.shields.io/badge/图标后的文字-徽章背景颜色16进制代码?style=for-the-badge&logo=godot-engine&logoColor=white"/> |
logo后输入图标对应的代码,可以在 SimpleIcons 中查找logoColor为logo的颜色
我试过设置文字颜色,但最终都会出bug
7. Metrics
这是一个非常非常强大的生成插件,涵盖的内容非常非常多,包含不限于
3D贡献图、Github个人信息、语言使用情况、Star用户国家分布图、代码变更信息、使用工具图标、近期star的项目、贡献者头像
等等等等,非常多的信息,集合后生成一张svg图
同样,我只会给出我使用的工作流,具体的东西请去这个项目的 Github页面 查看
因为效果图占用网页面积太大,就不放了
我的工作流
1 | name: Metrics |
感谢
这是我第一次写博客文章,十分感谢你看到这里
我的联系方式在指定博客,有问题可以问我
右上角有视频创作平台账号,欢迎关注
- 标题: Github主页Profile装饰指南
- 作者: wOLFSMITh
- 创建于 : 2025-04-20 00:42:01
- 更新于 : 2025-04-21 11:19:22
- 链接: https://redefine.ohevan.com/2025/04/20/GithubProfileGuide/
- 版权声明: 本文章采用 CC BY 4.0 进行许可。